
te·nac·i·ty
təˈnasədē/
noun
-
the quality or fact of being able to grip something firmly; grip.
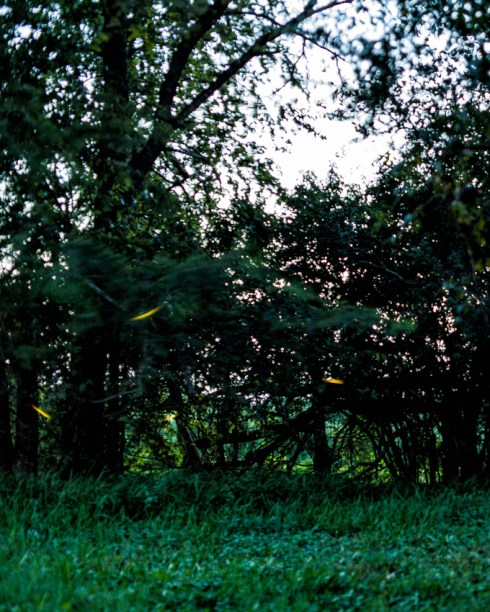
I found this tree holding on tightly to a creek bank a few weeks ago.
Life clings firmly to existence even when the odds are against it.
This disconnected connected world that we live in is a strange place sometimes. I accepted a link to like a page on Facebook. As I looked around the page (mostly to see if I wanted to like it), I came across a link to a young photojournalists page:
http://camille-lepage.photoshelter.com/#!/index
I am not a photojournalist. Not even close. I admire people that can put themselves out there to try to make a difference. I don’t always understand the need to do that but I admire it. Her photography is very moving.
I checked out her Twitter feed: https://twitter.com/@CamilleLep
Her tweets and photography were intense.
Then I moved to another site:
https://frontlinefreelance.org/member/camille-lepage
And last…. I went to this site. None of the other sites mentioned that she has been killed. Maybe it’s too soon?
http://www.loeildelaphotographie.com/2014/05/16/in-memoriam/24905/camille-lepage-1988-2014
26 is way too young to leave this earth. In some ways I guess she is still here, inside this giant neural net called the web. Or maybe that is just a feel good sentiment. I suppose that this sort of thing happens a lot but for some reason, this struck a chord (minor chord to my musician friends) in me.
I love to photograph lightning. Lightning is unpredictable, energizing (pun intended), and most recently, the act of photographing lightning pulled me out of the doldrums that i have been metaphorically sailing in for the last four months.
There are many approaches to photographing lightning. Some photographers rely on battery-powered triggers to, hopefully, capture a bolt of lightning as it traverses the sky. Some photographers use an intervalometer and let the camera merrily click away with the hope that a frame or two will have lightning in it. This is actually not a bad way to photograph lightning because if you let the camera run long enough you will also have the files that you need to create a nice time-lapse of the event. I’ve never used a lightning trigger and I probably never will. I’ve used the intervalometer method with mixed results. My favorite method is to place the camera in Bulb and trip the shutter when I feel that it is time to make a photograph.
What does “time to make a photograph” mean? Do I have a keenly honed sense of what the storm is going to do that allows me to predict the instant that a bolt of lightning is going to erupt from the cloud? No. I do not. Every storm has a randomness that defies predicting when and where lightning will strike. However, if you pay attention to it, you will find that the storm has areas of higher energy that produce more lightning events than other areas. The areas move within the storm in an unpredictable manner. Sometimes they move in the direction that the storm is moving. Sometimes they move toward the tail of the storm. Sometimes they are at both ends and all through the middle. Bonus! Where the higher energy is, for some unpredictable period of time, lightning is produced at a higher rate.
Now might be a good time to mention that it’s not uncommon for lightning to travel 20 miles or more before it finds a place to return to earth. You do not want to be standing at the return point when that happens. With that in mind, it’s safe to say that anytime that you photograph lightning you are at risk of being struck. Nothing I’m about to write is going to prevent lightning from striking you. Photographing lightning is dangerous.
It is very important to pay attention to where the storm is going and what the lightning is doing. Not only for photographic reasons but for your safety as well. During my most recent outing I photographed a very energetic storm. It was an easy storm to capture lightning from. It was coming toward me. Typically, when a storm is inbound as opposed to crossing or receding, the rain will drive me to seek shelter well before the lightning gets close enough to concern me. I use 6 miles as the drop dead, time to go inside distance. With today’s smart phones it’s easy to see nearly realtime weather radar to help you decide when it’s time to go indoors. Again, 6 miles is my “safe zone” number. In actuality there is nothing safe about it. It’s a feel good number that is usually superseded by rain from the storm.
In the case of the most recent storm that I photographed, the rain didn’t come until I had been inside for almost 45 minutes. The storm was still building. The gust front winds were warm and flowing toward the storm. That indicates that updraft forces are pulling the surrounding warm air into the storm, energizing it, and helping to create the intense light show that I was seeing. A storm that is mature or dying will usually have a gust front composed of the cold air aloft. The cold air is dragged down, so to speak, by the rain falling from the clouds, and when it strikes the ground it flows out in all directions. This is indicative of the collapse of the storm. What goes up must come down.
I waited for the rain to send me running for shelter and it never came. At some point the thunder got loud enough that it penetrated my thick skull and I took stock of my entire surroundings and not just the beautiful light show in front of me. I had lightning behind me, above me, and in front of me. When I saw that lightning surrounded me I packed everything up and went inside. The storm front was only about two miles away. It took almost 20 minutes for the large cloud to ground strikes that the storm was producing to start to pop near me. By near I mean flash and then count to 1 or 2 before the thunder sounded. It took 45 minutes for the 70+ mph wind gusts and driving rain to arrive. Sadly I did not think to video the scene. The feeling of raw power that the storm produced was amazing. Less than an hour later the storm spawned at least two tornadoes in remote areas. No property damage or injuries were reported that I’m aware of.
That should do for the Amateur Meteorology 101 part of this blog post. I give you this information because it is important to know something about the anatomy of a storm and to read what phase it is in. The web is full of better information than what I just gave you. Please look into it for your own safety.
The process of photographing the image below was really very simple. Camera shutter in Bulb mode. ISO 100. f2.8. Focus at infinity. When I felt that it was time to make an image I tripped the shutter for a 12 count. 12 seconds in other words. When the storm was farther away I used ISO 200 and a 15 second exposure. Exposure is easily determined from the histogram and ISO makes a great coarse exposure adjustment. Fine tune the exposure with the length of time that you hold the shutter open.
A lot can happen in 12 seconds when a storm as energetic as the one that I was photographing is in the viewfinder. The following image is the second image out of a dozen or so that I made. They all had lightning in them. I credit the storms intensity with the high rate of keepers. Typically I have some dark frames or frames with nothing more than illuminated clouds in them. Some storms yield a high percentage of lightning in the frames. Some make the photographer work hard for one mediocre image. Some give you nothing but the satisfaction of being there. Some of my best misses (images that I missed) occurred as I was walking away with my camera and tripod over my shoulder.
Thanks for reading my blog

I had a very intense year of photography in 2013. I photographed in the Outer Banks for a week, took six different trips to Big Bend, did a two week tour of four states in the southwest in October, and went to Death Valley for a week in December. By the time 2014 got here I had done all of the photography that I wanted to do. I was officially in the photographer’s doldrums and no matter what I couldn’t get in the mood to photograph. Some friends and I had two separate photography exhibits and not even that could get me out of the slump that I was in. I finally broke out of the doldrums last week and started taking an active interest in photography again.
The reader might be wondering what I did to recover from my malady. Did I start doing yoga? Did I start meditation? Did I force myself to make images? No, I didn’t do any of those things. In fact, I didn’t put much thought into it. I had other things to do and I knew that I would eventually come back to my cameras and start making images again. While traveling back home from Minot, ND I started making images. I planned a photography stop in Wyoming but ended up making images in South Dakota, Wyoming, and New Mexico. By the time I got to Colorado it was dark otherwise I would’ve made an image or two there. Once I had framed the first image and heard the shutter click I was engaged in the act of photography again.
If you are in a photographers slump, don’t sweat it. Keep your camera close and some day, out of the blue, you will see something that you will want to photograph.
I’ll try to be a little more diligent about posting to my blog as well.
This image was made in New Mexico on the second day of my drive home

Lightroom can seem difficult but once you get the hang of it it’s pretty easy. I’ve had Lightroom since the day that Adobe released it. I didn’t start using it until version 4. Most of this reflects my opinion. You will likely find contradictions to what I have written on the web. I’m good with that. This is what works for me today. I may discover something new after publishing this.
It’s best to work with raw files. LR’s default color space is Pro Photo RGB and bringing a sRGB or Adobe RGB image (smaller color spaces) into the Pro Photo RGB color space can make things look wonky
Here are a few Lightroom concepts for you:
(1) Catalogs. You only need one catalog. I’ve been toying with the idea of having a catalog for each year but it’s not necessary and I can’t see the benefit of having more than one catalog.
(2) A catalog is a place holder for the reference to your images. It doesn’t “contain” the images, it just points to them. LR is a nondestructive editor so your raw files are never modified from the original version.
(3) Library Module: this is where I add copyright info to the EXIF, cull the obviously bad images, rate the images if its an event shoot or from an extended trip, etc. After a while the keyboard shortcuts are easy to remember and use. After attending a recent Lightroom seminar, taught by Matt Kloskowski, I have changed the way that I flag images. I use his approach and use the following shortcut keys: P – Pick, U – Unpick, X – Reject. While in the Library module, look for the Metadata tag Headline. If you add a headline you can later use it in the Export function to add whatever is in the headline to the file name.
(4) Develop Module: this is where the editing is done. All of the functions are useful but I predominantly work in the Basic (most used), Tone Curve, HSL, Detail, Lens Correction, and Camera Calibration (only useful if you have a camera profile setup and that takes another piece of software). I don’t use Tone Curve much anymore because if I use curves (hardly ever) I do so in Photoshop CC. HSL is pretty cool. You can adjust the Saturation and Lightness of individual colors. Most recommend not moving a slider higher than 35 or 40. Detail is where Sharpening and noise removal are done. Lens correction: If your lens and camera is in the drop down box you can enable lens correction and it will automatically correct for lens imperfections. There is free software on the Lightroom website for creating lens profiles. I’ve never used it though.
Collections: This is not a Module. It’s in the left side at the bottom of the menu. These are real handy. You can create a collection, for instance a collection called Flamenco, and make it the Target Collection (Right Click, Set as Target) and when you see a Flamenco image that you know you will want to print or export, or whatever, you select it, hit the B key, and it shows up in the Target collection. Collections don’t “contain” the image. They point to them. Similar to catalogs but not the same. Now instead of hunting for your favorite Flamenco images you can just click on the collection, edit, print, export, whatever, without navigating to the individual folder on the hard drive.
Above the Basic module you have cropping and other tools
Crop and Straighten: If you want to free form crop you have to uncheck the little lock symbol where it says Original. You can click on Original and a drop down box will open to give you some presets or you can make your own. The Angle selection is nice for straightening horizons, etc.
Spot Removal: I keep mine set on Heal so it mimics the Content Aware Fill tool in CC.
Red-eye Reduction: This works good though I rarely need it
Graduated filter: very powerful and handy way to shape light, sharpness, etc in your image. You can add multiple graduated filters
Radial Filter: Absolutely my favorite tool on the tool bar. The first time you use it you will probably think I’m crazy for saying that. Click the Invert Mask checkbox and it becomes a more useful tool. By the way, every one of these tools has an on/off switch in the panel. The Radial Filter on/off is at the lower left corner of the panel with the Reset and Close button. The on/off switch is very handy for seeing the difference that the effect makes. You can add numerous Radial Filters, each with a different setting, to an image.
Adjustment Brush: This one is tied with the Radial Filter. It lets you brush in or out all kinds of adjustments. If you have a Wacom tablet you can make pinpoint adjustments with this tool. It’s also like the Radial Filter in that you can add multiple adjustments with different settings
Book Module: I haven’t used this yet but I’ve seen tutorials on it and it’s pretty dang nice
Slideshow Module: I used this to make a slideshow of my favorite images from this year and exported it out as a movie
Print Module: Once I figured this one out it became my goto way to print. Even if I edit in CC I print from LR.
Make sure you have a Catalog. Use the default name or make your own. It doesn’t matter
Import your images with File, Import. I changed how I import after the seminar. Lightroom will put your images in dated folders. I sill have a year folder, for instance I have a 2014 folder, but now, instead of downloading my images to a folder with the date of the image, with Lightroom, I create a folder under the year that the image was taken that is specific to the subject of the image. For instance my folder structure may be 2014–> Landscape and I put every landscape image that I shoot in 2014 into this folder. I don’t have to wonder what month or day that I shot a specific landscape image was. I just open the landscape folder. The Import function is still the same but instead of importing from a card or camera, I import from a folder that I downloaded the images to.
When you get finished with your raw file edits and you want to work on them somewhere else, like Silver Efex Pro 2 or CC, up on the menu bar click Photo—> Edit In and select the editing method. It will take you to the software and when you are through it will return you to Lightroom, where you can tweak the result, print, make a JPG, etc. The externally edited file will be a TIF or PSD or whatever your default format is. Mine is TIF because it’s smaller and not proprietary.
Make a JPG, etc: File—> Export. This is a busy little window but I’ll try to break it down for you
Export To: Specific Folder, Choose later, Same folder as original. I keep my TIF’s in a subfolder under the original called TIF and JPG’s in a subfolder under the original called JPG so I always use Specific Folder. I just have to remember to select Choose. I could probably make my exports faster if I used some of the other tools
File Naming: This is handy. I created my own template for this called Headline Filename Date.
File Settings: JPEG or TIF. sRGB color space since most of the time it’s going on the web and I only print my TIF or edited RAW files. Quality: 90 Limit File Size is unchecked
Image Sizing: This depends on what I want. If it’s a JPG going on the Web I’ll do Resize to fit W: 1280 H: 1280 pixels and 72-100 for resolution. 1280 x 1280 makes the longest side 1280. It does not affect the original aspect ratio. If it’s a full size JPG then I don’t check resize to fit and resolution is 360 pixels per inch
Output Sharpening: Depends on what I’m doing. Amount is always standard.
Metadata: I include all Metadata and check the Write Keywords box
Watermark: Nope…
Post processing: Do nothing
Back to the topic of Metadata, you can make your own template and then automatically add it to the files on import or you can Select All in the Library Module and add it from Preset drop down box in the Metadata tab. I used to have Presets for every year. Now I just have one called My Copyright. It has my name, address, phone number, Copyright box turned on and text that says hands off.
Like so: All Rights Reserved. No reproduction of any kind without express written permission.
I hope this helps someone make their way around Lightroom
Parting shot. This is Sotol Vista in Big Bend National Park

Hi again. Happy Valentines Day to everyone that reads this.
I’m going to go to a Lightroom 5 seminar this coming Monday. I am looking forward to going, learning, socializing, etc. I get around Lightroom pretty well. I’ve taken numerous online classes over at Kelby One. I did a marathon class over on Lynda.com that Matt Kloskowski taught on Lightroom 4. I don’t think that there is a feature that I haven’t at least explored except for maybe making and saving presets. I mentioned to a friend of mine that I was going to the seminar and she asked me why i was going. My response was why not. She said well… you know Lightroom better than anyone else I know so why go to more training? I’ve been thinking about that conversation most of the day. My answer is still, why not. It’s true that I feel pretty comfortable in Lightroom and that, for an average user, I do pretty well with it. I expect the seminar to be fast paced and I don’t expect them to dig into the program all that deeply. However, I expect to learn something on Monday and if I want to rise above “average user” I need to be exposed to people that know the software better than I do. My expectation that I will learn something is so high that I am willing to lay some big money on the line and bet anyone that reads this a solid 25 cents, in cash, that I will learn something from the seminar. 🙂
But… how much training is too much? I don’t know. I don’t think that a person can over educate themselves. I expect to learn something new every time that I pick up a camera or process an image. I expect the learning process to last my entire lifetime.
This blog is about how much training is enough… but my trip to Houston on Monday is as much about being in a room full of photographers that are excited to be learning, as well as meeting Matt K. and whoever comes with him, as it is about what I may learn in the process. I like the guys and gals that are part of the Kelby Media group. How can you not like them? They are successful, they seem to genuinely enjoy helping and being around people that are trying to learn the craft, not to mention they are pretty darn good photographers in their own right. And… they know that they are still learning the craft of photography. As good as they are they are still learning and having fun. What’s not to like about that?
On another note: I’m starting to get restless. I need a road trip. It needs to be a trip where all I care about is making an image. I love my “real job” but it requires a lot of mental energy. I think at the bit level 12-16 hours a day. Every day is a problem solving day and it wears me down. Photography lifts me up. I’m not sure when or where I’ll go but it’ll be soon and it’ll be west. Big Bend? The Chiricahua Mountains? Death Valley? I don’t know… maybe none of those. Maybe Caddo Lake or back to Shiloh Battlefield National Monument later this spring.
I’ve got 20 sheets of film loaded and a bunch of empty memory cards. It’s time to take them on a trip.
Oops, almost forgot the parting image:
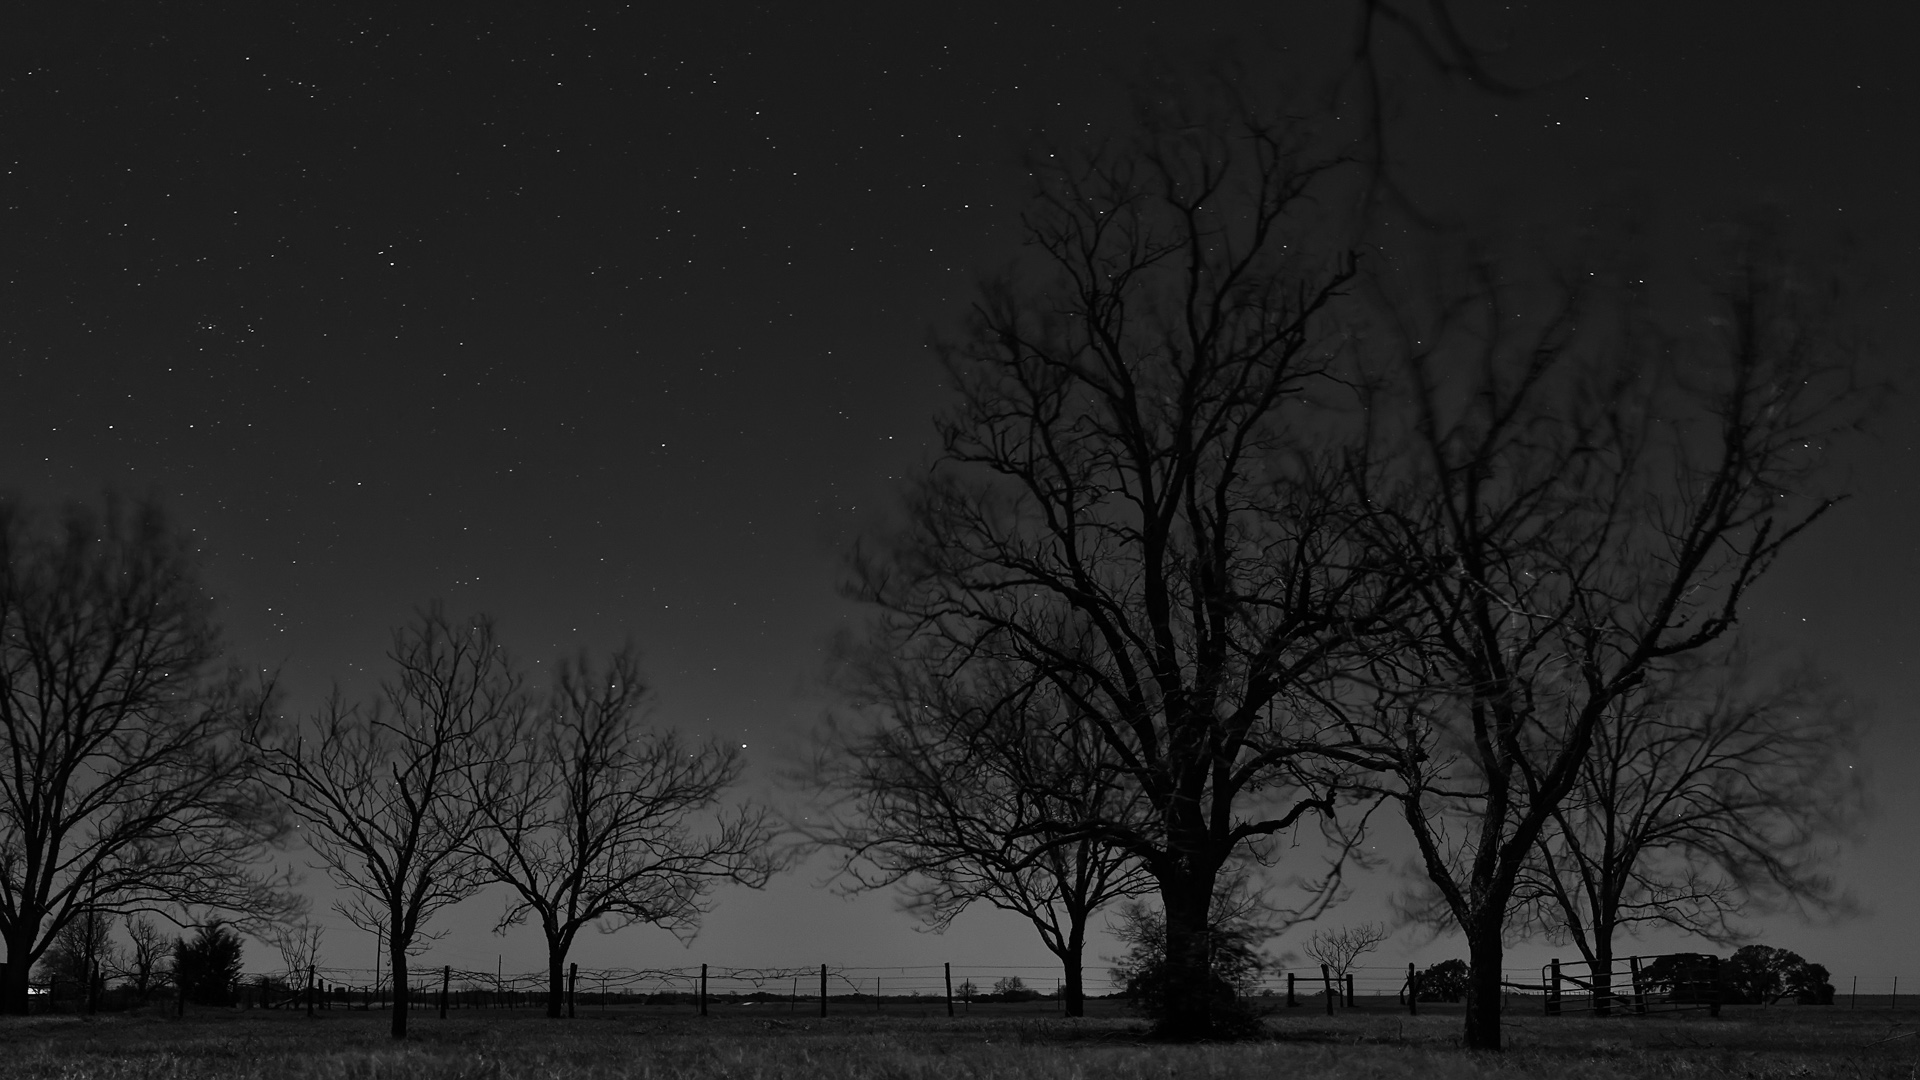
I call this one Trees Sleep Standing Up
Welcome to my blog. I started this blog as an exploration of the craft and the art of photography with some side trips into the business of photography. I hope that by reaching out in this way that I will gain, and possibly even be able to share, knowledge about my favorite subject.
20 sheets of film refers to my newfound love of large format photography. I have ten 4×5 film holders. Five holders have ten sheets of black and white film (Ilford Delta 100 or Fuji Acros 100) and five holders have ten sheets of color film (Provia 160 or 400). 20 sheets of film. Twenty opportunities to hone the craft of photography and hopefully, make a work of art.
What is the difference between “the craft” and “the art”.
The craft refers to the technical aspects of photography. We use words like f stop, shutter speed, exposure, ISO to describe a technical aspect of an image. These words are universal. They apply to film and digital cameras. Words like white balance apply to digital cameras. The digital darkroom has numerous terms that I won’t go into. The digital darkroom is where, for me, film and digital merge. These are the terms that speak to how an image is made.
The art is harder to pin down. Art is a subjective term. The art is described by words like feeling, emotion, and seeing. These things are not the same for each person and they cannot be the same for each person. Art is the term that speaks to why an image is made.
After 40+ years of trying to understand the craft, I think that I have a good understanding of it. Every time I think that I have a good understanding of something I find out that I have much to learn.
Sometimes I struggle with understanding the art of photography. What makes one photograph a piece of art and another a piece of crap? According to what I’ve seen on the internet, which must be true, nearly every image has some level of artistic value. I will not likely ever acquiesce to that way of thinking.
The business side of photography is a dark cave that I am tentatively beginning to explore so I don’t have much to say about it at this point.
I recently began to learn to use large format cameras, lenses, and films. The most often asked question when I tell people that is “Why?” The answer is simple, I enjoy it. It helps me to expand my knowledge of the craft. Making images with large format film is time consuming. It takes patience, attention to detail, and confidence. There is no histogram to assure me that the image that I made is exposed correctly. I have to get the details right or there is no image. I enjoy the process of developing my own film. I scan my own negatives but I can’t say that I enjoy the process. It’s necessary since I do not have a wet darkroom.
I have not abandoned the digital format. Quite the opposite is true. I have room in my world for all things that are photography. Unlike my film cameras, my digital cameras are always with me.
All of my vacation time is spent immersed in photography. I travel to wonderful places to make images of wonderful things. Occasionally I make wonderful images and that makes the experience even more enjoyable.
I will leave my readers with an image that I made during the National Park closings in 2013. The parks closed on the day that I left for a two week, 5,500 mile journey through the southwest with some friends of mine. The closing changed our direction, but they didn’t affect our path.
Dead Horse Point State Park, UT

| Michael Lloyd on How much training is enou… | |
| Michael Lloyd on First light | |
| itisnovember on How much training is enou… | |
| Spencer Photo on First light |
